Get Started (Install)
Particl Marketplace provides you with the most secure, private, and unrestricted e-commerce experience on the web. This section will teach you how to install and configure it to your liking, as well as how to back up your Marketplace data.
Install Particl Marketplace
To get started with Particl Marketplace, you need to first download and install the Particl Desktop client.
Download
Choose the correct version to download.
Windows file version
Download the
particl-desktop-X.X.X-win.exeinstaller file. It supports any version of Windows.Download sources
Particl Homepage: https://particl.io/downloads
Particl Github: https://github.com/particl/particl-desktop/releases/latest
Attention
NEVER download Particl clients from third-party websites! Bad actors are constantly trying to distribute malware-infected versions of popular cryptocurrency wallets to steal your funds! Always download directly from official sources.
MacOS file version
Download the
particl-desktop-X.X.X-mac.dmginstaller image. It supports any version of MacOS.Download sources
Particl Homepage: https://particl.io/downloads
Particl Github: https://github.com/particl/particl-desktop/releases/latest
Attention
NEVER download Particl clients from third-party websites! Bad actors are constantly trying to distribute malware-infected versions of popular cryptocurrency wallets to steal your funds! Always download directly from official sources.
Linux file version
Depending on your Linux distribution, you can choose between different packages, including Debian-based
.deb,.rpmpackages, or a distribution-independent.AppImageversion.Once you know which Linux distribution you are running, it is easy to find out which package manager you have, and which package will suit you. The distribution independent
.AppImagewill also be of great help.Download sources
Particl Homepage: https://particl.io/downloads
Particl Github: https://github.com/particl/particl-desktop/releases/latest
Attention
NEVER download Particl clients from third-party websites! Bad actors are constantly trying to distribute malware-infected versions of popular cryptocurrency wallets to steal your funds! Always download directly from official sources.
Installation process
Windows installation
Verify the checksum of the file.
Open the downloaded particl-desktop-X.X.X-win.exe installer file.
Follow the installation instructions.
An executable file will be added to your desktop and into the application launcher menu. Use this to start Particl Desktop.
Assign allow-rules to your computer’s firewall and antivirus software. On a standard Windows installation, Microsoft Defender pops up.
Note
Ignoring step 5 may cause a degraded blockchain sync or communications problems with other peers. If you are unsure how to apply rules to your firewall and anti-virus software, please review the vendor’s documentation of your installed programs.
MacOS installation
Verify the checksum of the file.
Open the downloaded particl-desktop-X.X.X-mac.dmg installer image by pressing CONTROL + MOUSE-RIGHT ◳ and clicking on Open from the appearing shortcut menu. Do not just double-click the icon.
Drag and drop the Particl Desktop.app file into the Applications folder.
Open the Applications folder and locate the Particl Desktop.app file.
Press CONTROL + MOUSE-RIGHT ◳ on the Particl Desktop.app file and click Open.
On the first launch, your computer’s firewall must get a rule to allow Particl Desktop to communicate with the blockchain.
From now on, you will be able to start Particl Desktop from the Launchpad or Spotlight (e.g., COMMAND ⌘ + SPACE and type “Particl” > hit ENTER ↵) search.
Note
Ignoring step 6 may cause a degraded blockchain sync or communications problems with other peers. If you are unsure how to apply rules to your firewall and antivirus software, please review the vendor’s documentation of your installed programs.
Linux installation
Verify the checksum of the file.
Navigate to where you’ve downloaded your installer file in the terminal.
Depending on your package manager, this command will vary.
Debian-based installation
sudo apt install particl-desktop-x.x.x-linux.deb
RPM-based installation
sudo dnf -i particl-desktop-x.x.x-linux.rpm
AppImage
chmod a+x particl-desktop-x.x.x-linux.AppImage
./particl-desktop-x.x.x-linux.AppImage
On the first launch, your computer’s firewall must get a rule to allow Particl Desktop to communicate with the blockchain.
An application launcher will be added to your applications menu when using .deb or .rpm installations. Click it to start the Particl Desktop client.
Note
Ignoring step 4 may cause a degraded blockchain sync or communications problems with other peers. If you are unsure how to apply rules to your firewall and antivirus software, please review the vendor’s documentation of your installed programs.
Tip
If you want to launch it from the terminal, quotation marks may be required because there is a space in the name (Particl Desktop).
user@linux:~> which "Particl Desktop"
/usr/bin/Particl Desktop

user@linux:~> "/usr/bin/Particl Desktop"
(Particl Desktop:16887)
Congratulations! You have installed Particl Marketplace.
Hint
Loading and Syncing Times
Because the Particl Marketplace’s content is hosted on a distributed network for payments and exchange of data, the marketplace may take a few minutes to sync. It may also take a few more minutes to load all marketplace listings fully. Those short wait times are normal in the current state of the marketplace and will get much faster in future updates.
If you open the Market > Browse module, keep an eye on the Refresh button. As soon as a count appears, new listings have arrived. Click on it to refresh the listings display. With very slow connections, the entire syncing process can sometimes take up to an hour.
Checksum verification
Obtain the checksum code from the official download sources for the downloaded file. Each file has its own checksum.
From the official download source, obtain the checksum of the file you’ve just downloaded. Each file has its own checksum, so make sure you select the release you’ve downloaded.
To verify the integrity of the downloaded file — ensuring that it hasn’t been tampered with in any way — validate your file’s hash against the checksum provided in the official download source.
Checksum verification command with terminal
Open Windows Explorer.
Press SHIFT ⇧ + MOUSE-RIGHT ◳ on the Download folder and choose Open command window here or Open power shell here.
Type the following command into the terminal while changing
filenamefor the real and complete filename of the downloaded file and hit ENTER ↵.CertUtil -hashfile filename SHA256
Checksum verification command with terminal
Tip
Prerequisite: Head into System Preferences and select Keyboard > Shortcuts > Services. Find New Terminal at Folder in the settings and enable the checkbox.
Open Finder.
Press MOUSE-RIGHT ◳ on the Download folder of the file and you’re shown the services > open terminal command to open the terminal at this location.
Type the following command into the terminal while changing
filenamefor the real filename of the downloaded file.shasum -a 256 filename
Checksum verification command with terminal
Open a terminal where you downloaded the file and type the following command by changing
filenamefor the real filename of the downloaded file.sha256sum filename
Once that is done, compare the checksum output you’ve received in the step above with the checksum provided in the official download sources. The screenshot below shows an example of this checksum highlighted from the GitHub release notes Verification section.
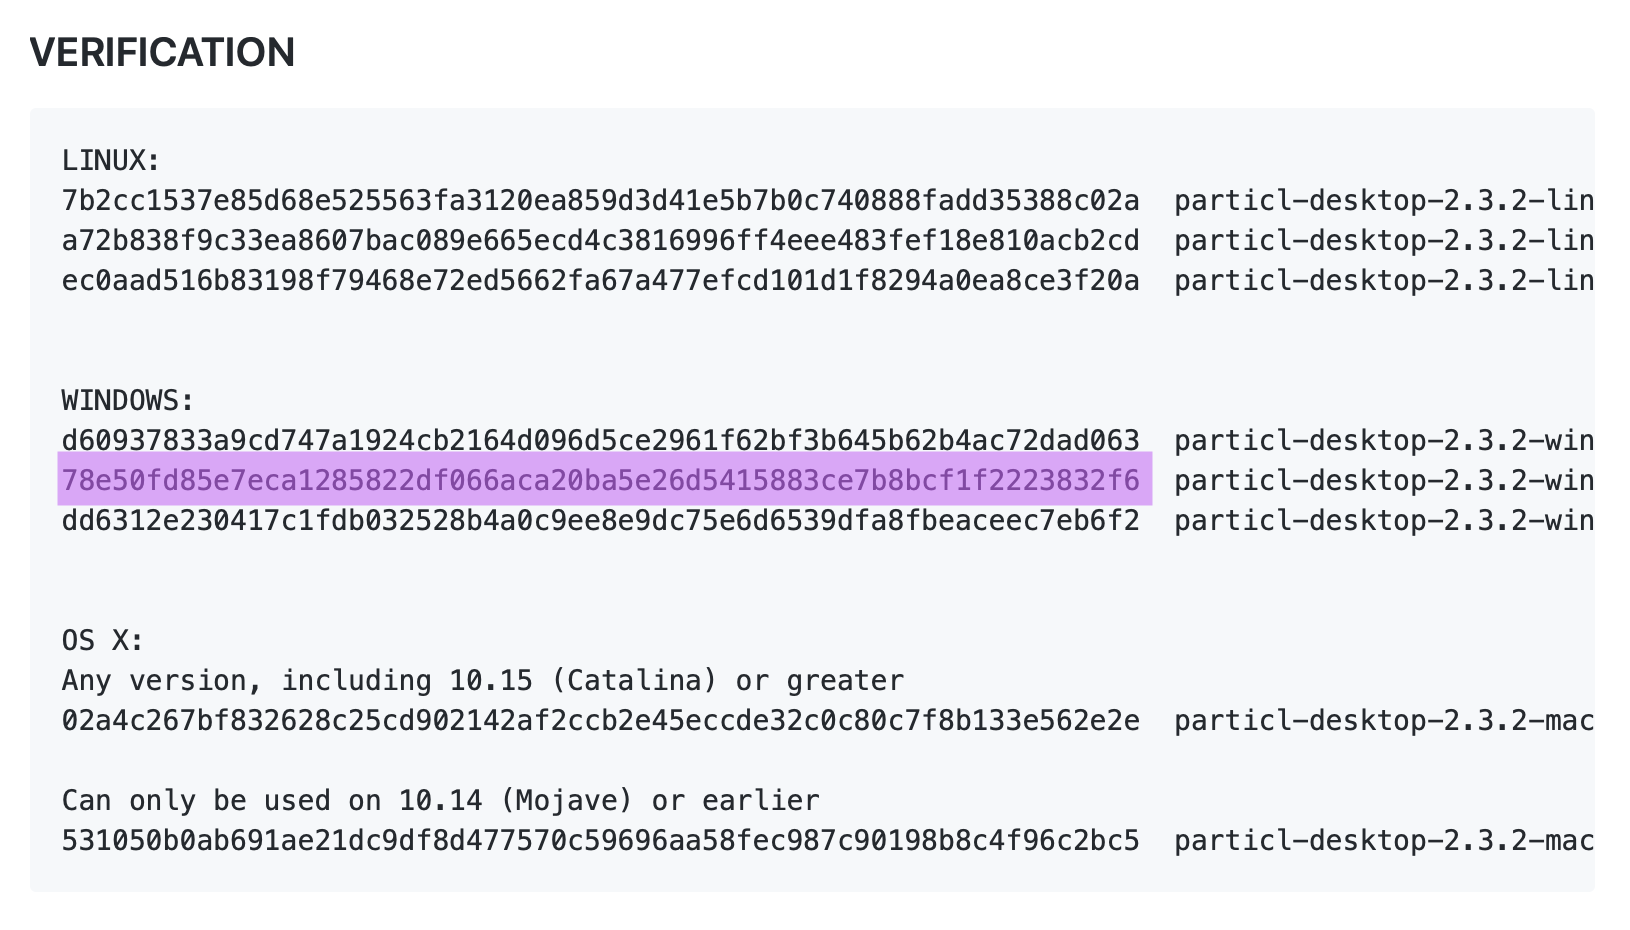
Particl Marketplace installation checksum highlighted image
Troubleshooting checksum mismatch
If the output does not match, try downloading the file again. Verify that you did not unzip or rename the file. In some cases, it might be possible that antivirus software may alter files; be sure to have a solution on your own in that case.
Attention
If all attempts fail to have a matching number, do not install Particl Desktop unless you know what you are doing, and reach out to Particl Support for assistance.
Starting Particl Desktop
You have two options: startup with the launcher icon (recommended) or a terminal command.
Startup with Launcher
Launching Particl Desktop with Launcher
Open your Start Menu by pressing the WIN ⊞ key.
Start typing
Particl.Click on the Particl Desktop launcher icon.
Launching Particl Desktop with Launcher
Open Spotlight (e.g., COMMAND ⌘ + SPACE).
Type
Particl.Click on the Particl Desktop launcher icon.
Launching Particl Desktop with Launcher
Open your applications menu.
Click on Particl Desktop launcher icon.
Startup from Terminal
Sometimes it is handy to start Particl Marketplace from the terminal, aka command line. It gives you plenty of output and information about what is happening in the background.
Launching Particl Desktop from terminal
Open Windows Explorer.
Press SHIFT ⇧ + MOUSE-RIGHT ◳ on the Installation folder (e.g.,
C:/Program Files/Particl) and choose Open command window here or Open power shell here.Type the following command into the terminal and hit ENTER ↵.
“Particl Desktop.exe”
Launching Particl Desktop from terminal
Open Terminal (i.e., COMMAND ⌘ + SPACE and type “terminal” > hit ENTER ↵).
Type in this command:
/Applications/Particl\ Desktop.app/Contents/MacOS/Particl\ Desktop
Launching Particl Desktop from terminal
Open a terminal in the folder where you’ve installed Particl Desktop and type the following command.
./Particl\ Desktop
Backup Account and Data
File locations
After a successful installation of Particl Desktop, the main application has been installed into the standard location of your operating system. When running Particl Desktopfor the first time, it will create user-specific data within your user account. These files include settings, log files, wallets, and the blockchain data itself. We recommend manually backing up that data on a secure device from time to time as a good practice to follow.
 ## Windows paths

"%UserProfile%\AppData\Roaming\Particl"
"%userprofile%\AppData\Roaming\particl-bot"
"%userprofile%\AppData\Roaming\particl-market"
"%userprofile%\AppData\Roaming\Particl Desktop"
 ## MacOS paths

"~/Library/Application Support/Particl"
"~/Library/Application Support/particl-bot"
"~/Library/Application Support/particl-market"
"~/Library/Application Support/Particl Desktop"
 ## Linux paths

"~/.particl"
"~/.particl-bot"
"~/.particl-market"
"~/.config/particl-desktop"

## Launcher path

"/opt/Particl Desktop/Particl Desktop"
See also
Other sources for useful or more in-depth information:
Particl Wiki - Backup & Restore wallet
Install Tor (Network Privacy)
Attention
For security reasons, Tor is the only privacy setting not enabled by default. You can easily enable it by routing your client’s connection through its network.
Danger
Always make sure your Tor node is up-to-date with the latest version. This is a critical requirement that, if not followed, can heavily compromise your online privacy and potentially let other people spy on your online activity.
To make sure you don’t download a compromised version of Tor, always download it from their official website. Additionally, avoid any man-in-the-middle attack by always verifying the encrypted signature attached to the Tor files you download. To do so, follow this tutorial on how to verify Tor signatures written by the Tor team itself.
You can run the Tor network using two different methods, after which you can route Particl Desktop through it. Always make sure that, regardless of the installation method you choose, Tor is running the latest version before using it.
Using the Tor browser
Download the Tor Browser and install it on your computer.
Launch the Tor browser.
Connect to the Tor network by clicking on Connect or configure your connection parameters by clicking on Configure.
Once connected, leave the Tor Browser running in the background of your computer.
Using the Tor daemon
Download the Tor Browser and install it on your computer.
Open Windows Explorer and navigate to the Tor installation directory (e.g.,
C:/Program Files/Tor Browser).Go into the
Tordirectory, hold down SHIFT ⇧ and click with MOUSE-RIGHT ◳.Open the Open command window here from the menu.
In the terminal that pops up, type:
tor.exe –service install
Verify that the Tor service is running, type:
sc query "Tor" | find "RUNNING"
Tip
If you haven’t got Homebrew yet, install it using this terminal command.
 xcode-select --install
ruby -e "$(curl -fsSL https://raw.githubusercontent.com/Homebrew/install/master/install)"
echo "export PATH=/usr/local/bin:/usr/local/sbin:$PATH" >> ~/.profile
Enable Tor on Particl Desktop
After starting Tor on your computer using either the Tor Browser or a daemon, route your Particl Desktop connection through it. You can do this by either adding a proxy argument to the desktop’s launch command or by changing its settings after launching the application.
Enable Tor by Default From GUI
Open Particl Desktop and click on Particl Desktop Settings in the bottom left corner.
Go to Core network connection and enter
127.0.0.1:9150into the Connect via Proxy field if you are using the Tor Browser OR127.0.0.1:9050if you are using the Tor daemon.Hit Save changes and restart Particl Desktop.
Enable by Tor Default From Terminal
Open the configuration file:
nano ~/.particl/particl.confIf you are using Tor Browser, add this line to the configuration file:
proxy=127.0.0.1:9150
If you are using Tor daemon, add this line to the configuration file:
proxy=127.0.0.1:9050
Note
From now on, Particl Desktop will always connect to the internet using Tor. If Tor is not running on your machine, then Particl Desktop will not be able to connect to other peers. You can always revert back to the default setting to disable Tor.
Enable Tor Once From Terminal
Launching Particl With Tor
Open Windows Explorer, press SHIFT ⇧ + MOUSE-RIGHT ◳ on the installation folder (e.g.,
C:/Program Files/Particl), and choose Open command window here or Open power shell here.If you are using Tor Browser, type the following commands into the terminal and hit ENTER ↵.
“Particl Desktop.exe” -proxy=127.0.0.1:9150
If you are using Tor daemon, type the following commands into the terminal and hit ENTER ↵.
“Particl Desktop.exe” -proxy=127.0.0.1:9050
Launching Particl With Tor
Open Terminal (e.g., COMMAND ⌘ + SPACE and type “terminal”, then hit ENTER ↵).
Type in this command if you are using Tor Browser:
/Applications/Particl\ Desktop.app/Contents/MacOS/Particl\ Desktop -proxy=127.0.0.1:9150
Type in this command if you are using Tor daemon:
/Applications/Particl\ Desktop.app/Contents/MacOS/Particl\ Desktop -proxy=127.0.0.1:9050
Launching Particl With Tor
Open a terminal in the folder where you’ve installed Particl Desktop and type the following command if you are using Tor Browser.
./Particl\ Desktop -proxy=127.0.0.1:9150
Type the following command if you are using Tor daemon.
./Particl\ Desktop -proxy=127.0.0.1:9050
Important Considerations
Keep Tor up-to-date
It is critical to manually maintain your Tor node to the latest version. Otherwise, you can heavily compromise your online privacy and security by remaining vulnerable to a wide range of potential attacks on the network.
As the network itself is widely targeted by hackers due to the privacy it provides, unpatched versions of Tor are considered unsafe to use. If exploited, a compromised version of Tor may leak your true identity and even let others spy on your online activity.
Tor constantly pushes important security updates, so make sure to always be on the lookout for them.
Updating Tor
Open the Tor Browser.
Check if the browser prompts you to update to a newer version.
Updating Tor
Open Terminal (e.g., COMMAND ⌘ + SPACE and type “terminal” > hit ENTER ↵).
Type this line of code and hit ENTER ↵.
brew update && brew upgrade
Updating Tor
Open a Terminal and run the upgrade procedure depending on your package manager.
Example
sudo apt update && sudo apt-upgrade
Depending on your Linux distribution, this command may vary. There are multiple package managers out there, but they all have the same role in this case.
See also
Marketplace Guides - Install and Get Started
Marketplace Guides - Sell Stuff
Marketplace Guides - Buy Stuff
Particl Wiki - Open Market Protocol
Particl Wiki - SecureMessaging
Github - Particl Desktop
Github - Particl Core
Unofficial Gateway - Particl Store
Unofficial Gateway - Particl Marketplace Shop
Particl Explained - Privacy Specifications
Particl Explained - Two-Party Escrow System